
Call (610) 664-5555
Call (610) 664-5555
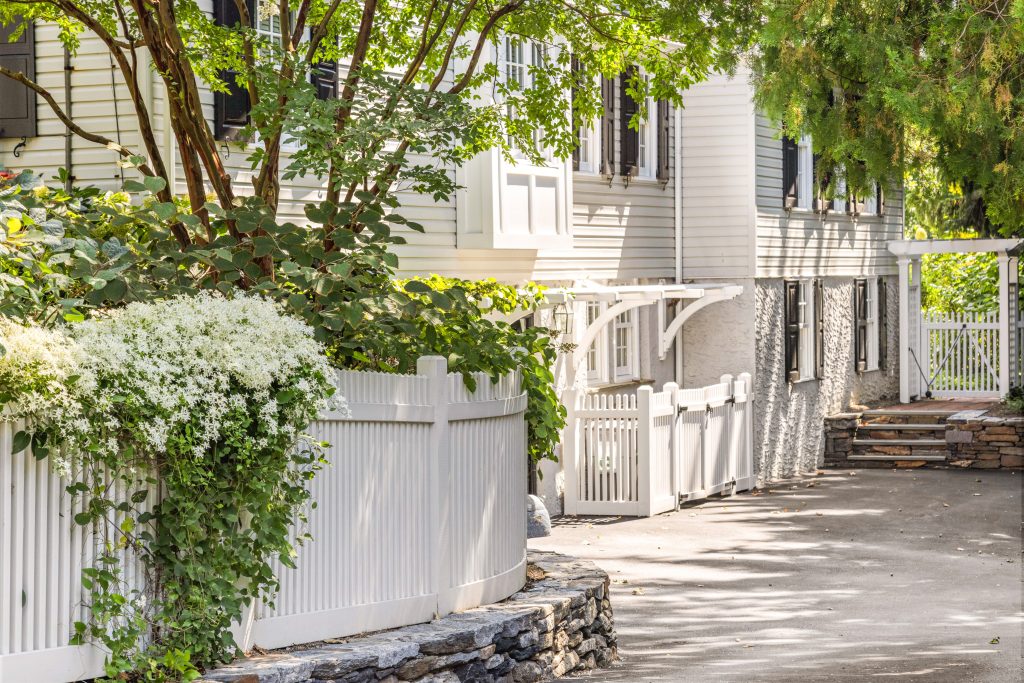
Picture this: the graduation invitation is on the fridge, and the caterer is booked. You were finalizing the guest list and ordering flowers when you looked up and noticed the fence has been slowly graying out for a few seasons. The paint that is chalking at the rails and peeling at the base of the posts is going to be in the background of every photo from now through Labor Day.
For homeowners on the Main Line and across Philadelphia’s established neighborhoods, springtime is when outdoor spaces get put to real use. From graduations to summer barbecues, from inviting a few neighbors over to hosting a family reunion, you want your outdoor spaces to provide the perfect backdrop for making memories. Painting a fence could be the small simple touch that adds polish to the setting without calling attention to itself.

Not every fence needs to be painted. But if you have a structurally sound wooden fence with a weathered finish, a fresh coat will seal the wood against moisture, slow the damaging effects of UV rays, and protect against the mold and mildew that Philadelphia’s humid summers accelerate.
“Some fences look best unpainted. Some are constructed from materials that have a built-in finish that protects them from the elements and requires no additional paint,” says Dennis, one of the craftsmen at John Neill Painting. “It’s always good to keep in mind that anything you paint will eventually have to be repainted. So if the fence doesn’t need it, there’s no reason to start that cycle.”
Vinyl fencing, for example, can be painted but generally doesn’t need it. Modern extruded metal and most steel or aluminum fencing usually has a factory-applied protective finish. As long as that finish is intact, there is no need to paint. Wrought iron, on the other hand, requires paint to stay protected from the elements and requires specific materials to get the job done right.
Pressure-treated wood, both new and aged, is naturally beautiful and saturated with chemical preservatives. If you decide to paint it, wait several months so the excess preservatives can evaporate and the paint can bond properly.

In the Philadelphia area, late spring is the ideal window for painting a fence, with moderate humidity and enough dry days to allow proper curing before summer. Spring is the busiest season for exterior work, so the earlier you book your service, the more flexibility you’ll have in scheduling.
Avoid starting a fence project when:
The right product for painting a fence depends on the material.
Use an exterior-grade acrylic latex or a quality solid stain with a high-grade bonding primer on bare or heavily weathered sections. If the finish coat will be a color other than white, have the primer tinted to the closest matching shade.
You’ll need a primer formulated for non-porous surfaces. The color should not go significantly darker than the original, as vinyl absorbs heat, and darker shades can cause warping.
Iron must be primed with an oil-based rust-preventative primer, followed by an acrylic or oil-based topcoat.
If the factory finish is worn, confirm the paint’s compatibility with the existing coating.
“There are so many different types of fencing that it would be impossible to prescribe an exact method of application without seeing the fence in question,” says the team at John Neill Painting. “If you’re planning on painting a fence yourself, take a photo of the fence to the paint store and talk to an experienced associate. Let them guide you on the materials and tools needed to do the job properly.”

The best tool depends on the fence type, its scale, and the equipment available.
“Solid wall fencing is easiest to paint with a conventional roller and brush, and slats and posts are the second easiest with simple tools,” says the painting pros. “Chain link and wire fences can also be painted with a brush and roller. Spraying is best left to a professional painter. A high-quality airless sprayer is usually best suited for this type of job, especially if the fence is long, high, or both.”
The professional approach to painting a fence depends on the proximity to the house and style of fence. One option is to spray for even coverage, and then roll it back into the surface to drive it into the grain and ensure proper adhesion. Spraying without back-rolling can result in peeling later. A more common option for residential areas is to brush and roll for better control and to avoid any issues with overspray.
Proper preparation is also essential to ensure a long-lasting application. Thoroughly clean the fence of any dirt, mold, or mildew, and remove the existing paint. Let it dry completely for 24 to 48 hours, then fill cracks, sand rough areas, replace compromised sections, and begin priming. Follow with two coats of topcoat, allowing each to fully dry between applications.
The best outdoor spaces are those where everything feels considered, and the details work together, with nothing pulling attention away from the people and the moment. A freshly painted fence makes the whole yard feel a little more polished.
John Neill Painting’s craftsmen work on fences, exteriors, and outdoor spaces across the Main Line and the greater Philadelphia area every spring and summer. Check out our portfolio to see examples of our work. We guarantee thorough preparation, the right materials for the conditions, and execution that holds up long after the party’s over.
If your fence is on the list for a refresh this spring, we’re scheduling exterior painting projects now – request an estimate or call us at (610) 664-5555.
Yes, when the fence is structurally sound and the existing finish has worn past the point of protecting the surface. But not every fence needs paint: vinyl, pressure-treated wood, and many metal fences come with built-in protection that makes painting unnecessary unless the original finish has failed. The condition of the fence and its material determine whether painting makes sense or whether you’re starting an unnecessary maintenance cycle.
You can, if the existing finish is clean, dry, and firmly adhered. If the paint is peeling, blistering, or chalking heavily, it needs to be removed or treated first. Painting over a failing finish causes the new coat to fail just as quickly.
It depends on the material. Wood fences do best with exterior-grade acrylic latex or a solid stain. Vinyl requires a primer specifically formulated for non-porous surfaces. Wrought iron needs an oil-based rust-preventative primer before any topcoat. When in doubt, take a photo of the fence to a reputable paint store and ask for guidance on the right products for your specific surface.
For most homeowners, rolling and brushing is the most practical and controlled approach. Professional spray equipment is faster and better suited for long or tall fence runs, but it’s most effective in experienced hands. When spraying, the professional standard is to back-roll immediately after, driving paint into the surface for proper adhesion.
Avoid painting when rain is forecast within 36–48 hours, when temperatures are below 50°F or above 90°F, when the fence is still wet from recent washing, or when there’s visible rot or structural damage. Also hold off if you’ve recently installed pressure-treated wood; wait several months for the preservative to evaporate before applying any coating.
No. The fence should be cleaned before painting but must be completely dry before any primer or paint is applied. Painting over a damp surface traps moisture beneath the finish, leading to blistering and premature peeling.
Yes, but vinyl generally doesn’t require painting because it’s designed to hold its finish without it. If you do choose to paint vinyl, use a primer formulated for non-porous surfaces, and don’t go significantly darker than the original color. Darker vinyl absorbs more heat, which can cause warping. Keep in mind that once you paint vinyl, you’re committing to repainting it down the road.
Stucco gives a home texture, character, and timeless curb appeal. Over the years, weather, moisture, dirt, mildew, and even minerals within the stucco itself can leave it looking faded or uneven. A thorough cleaning may improve the surface, but it usually won’t undo the effects of age and exposure. The right paint and color choice can bring it back to life.
The best stucco paints do more than cover discoloration, they protect the home from the elements. The right color choice will complement the home’s architecture, fit in naturally within the surrounding neighborhood, and give the exterior a more refined, well-cared-for appearance. In this guide, we’ll cover how to evaluate your home, choose a color palette that works, and plan for the prep and application details that ensure painted stucco yields a durable and beautiful finish.

The answer to “What is the best color paint for stucco?” varies, but three key factors should be considered before you start looking at stucco paint color swatches.
Your home’s architecture is your greatest asset and offers the perfect starting point. Colors that look bold and stunning on a contemporary home can look very odd on a classic Victorian, and vice versa. Before you start falling in love with a particular shade, consider whether it suits the style of your home.
The traditional homes of Philadelphia’s Main Line benefit from refined neutrals that allow architectural details to speak for themselves.
The homes of Philadelphia’s historic neighborhoods often share walls or sit in tightly composed streetscapes. Chestnut Hill, Germantown, and Society Hill all have neighborhoods where the colors of the homes closely interplay with one another. You may also have historical commission guidelines to consider before deciding on a palette.
Your paint choice also has to work with a wide range of other accents. Your roof color, stonework, brick, and even your neighbor’s exteriors all have an impact. Study your home from the street at different times of day to observe how the lighting affects it. Are you seeing warm undertones or cool ones? Are natural textures more prevalent than man-made? You want to use this information to choose a color that feels like it was always meant to be there.
Another important consideration is that, on most stucco homes, the majority of the surface area consists of stucco with accents like window frames, shutters, and cornices taking up less space and having less visual impact. These proportions are important when choosing colors; a large area of color can look very different from the small paint swatch in your hand.
If you’d like to choose a color that reflects heat and keeps your home cooler, light colors like white and warm beige are a good bet and tend to fade more slowly in the sun. Darker colors will absorb more heat and start to fade sooner on south- or west-facing exposures. Philadelphia’s freeze-thaw winters also take a toll, making paint quality and proper preparation essential.
Stucco’s porous texture absorbs light, so colors usually show up a little richer and darker on the home than on the swatch. It’s always best to test a patch on the actual stucco surface and check it in different lighting conditions before making a final decision.

It’s not a coincidence that the most popular stucco paint colors are light neutrals. Most stucco homeowners base their choice on the natural surroundings of the region; what looks outstanding in Miami can look out of place in Philadelphia. Throughout the Northeast, earth tones and whites are most common for their ability to blend into the environment and create a cohesive look.
“Most people who paint stucco choose a color that mimics natural stucco. Light grays and light greens can work beautifully, depending on the setting and your tastes. But the context of the location always comes first,” says one of the craftsmen at John Neill Painting.
White is risk-free and works well with any architectural style, offering an elevated and tasteful look. Choosing the right shade of white ensures it won’t be too bright or harsh. Alabaster and Greek Villa by Sherwin-Williams are popular choices for their warm undertones that both contrast and complement natural stone and dark ironwork.
Mega Greige and Cape May Cobblestone are both warm and inviting beiges that tend to pick up whatever hues are around them. Near shrubbery, they’ll pick up green tones, or lean warmer when accompanied by brick.
Gray is another color that works as a stucco paint color for any architectural style. Its versatility makes it especially perfect for spaces that merge styles. A mid-range tone like Dovetail adds depth without drama to Main Line homes with dark window casings, natural stone, or historic ironwork.
Butter yellow is becoming one of the most talked-about colors in fashion, and it translates beautifully to stucco. It reads as warm and welcoming without being loud, offering just enough personality to stand out in a neighborhood of whites and grays. One of the most popular pairings we’re seeing is yellow stucco with a deep green front door, a combination that feels both fresh and rooted in the classic charm Philadelphia is known for. If you’re looking for a color that’s current but won’t feel dated in five years, butter yellow is worth considering.

Once you’ve committed to a stucco paint color, proper preparation and application will determine how good it looks and how long it lasts. There are two standard methods:
In both cases, the rolling step is essential to drive paint into the pores of the stucco and ensure proper adhesion. Spraying or brushing alone can leave the deep recesses of the texture underpainted, leading to inadequate bonding and premature peeling.
The biggest difference between the two methods isn’t the result but where the time goes. Spray application front-loads the work: the bulk of the time is spent masking off everything around the surface to prevent overspray, with the actual painting going relatively quickly. Brush and roll flips that equation, with most of the time spent in the application itself. We primarily brush and roll our stucco projects, and in our experience the results are the same, if not a little better..
Acrylic-based coatings designed specifically for masonry should be used, as they are formulated to expand and contract with the substrate, and retain color and sheen for many years. For stucco projects, we use and recommend StoCoat Lotusan, a coating specifically engineered for stucco, concrete, and masonry finishes. What sets Lotusan apart is its Lotus-Effect technology, modeled on the microstructure of a lotus leaf. Water and dirt are unable to bond to the surface and simply flow off with rainfall, keeping the facade looking clean and dry over time. This self-cleaning effect also resists the growth of mold, mildew, and algae, a meaningful advantage in a climate like Philadelphia’s. The coating is UV-stable, highly vapor-permeable, and available in virtually any color, so we’re able to match whatever Sherwin-Williams or Benjamin Moore color you’ve chosen for your home.
Once you start painting your stucco, repainting is required. As multiple coats are applied over the years, heavy buildup can lead to cracking and peeling, which must be addressed before the next repaint.
“Previously painted stucco must be power-washed to remove scaling paint. Traditional scraping and sanding don’t work properly on its rough texture. Wire brushing can also be helpful,” says the team at John Neill Painting.
The same texture that makes stucco stand out also makes preparation more demanding. You’ll need to complete the power washing with the right pressure and angle to avoid damaging the stucco, and address any hairline cracks before applying primer. Skipping these steps is the most common reason why even high-grade exterior stucco paint fails early.

The homeowners we work with on Philadelphia’s Main Line and across the city’s historic neighborhoods aren’t just looking for someone to hold a brush. They want a partner who understands their home’s architecture, can guide them through the overwhelming number of options, and treats their home like it’s their own. Scroll through our portfolio to see how we’ve earned our stellar reputation.
That’s what John Neill Painting brings to every project: over 50 years of experience, an in-house crew of trained craftsmen with deep knowledge of historic surfaces and masonry finishes, and a process that’s transparent and respectful from the first walkthrough to the final coat.
Whether you need custom exterior painting or carpentry and repair services for your stucco home, request an estimate or call (610) 664-5555 and we’ll help you bring your vision to life.

The most reliable choices are light neutrals, such as warm whites, soft beiges, taupes, and grays. These shades work across architectural styles, hold resale value, and age gracefully. Stucco color choices tend to be regional, but earth tones and whites generally dominate because they complement the environment and read as natural.
Warm whites are overtaking stark bright whites for a softer, more timeless look. Warm beiges and greiges are also popular for their versatility and staying power. Butter yellow is the color having a moment right now, warm and welcoming without being loud, and particularly striking paired with a deep green front door.
Both spray and brush application should always be followed by rolling to drive paint into the pores of the stucco and ensure proper adhesion. The main difference between the two methods is where the time goes: spray application requires extensive masking to prevent overspray, while brush and roll puts most of the time into the application itself. We primarily brush and roll our stucco projects and find the results are the same, if not a little better.
Acrylic-based masonry paints formulated specifically for masonry surfaces are the best choice for stucco. These coatings are designed to expand and contract with the substrate and retain color and sheen over many years. We use and recommend StoCoat Lotusan, which adds the benefit of Lotus-Effect technology, a self-cleaning surface that repels water and dirt and resists mold, mildew, and algae.
A flat or matte finish is generally recommended for stucco because it doesn’t highlight the surface’s natural texture and imperfections as much as satin or semi-gloss finishes do.
Your home’s exterior creates the first impression long before anyone steps inside. It speaks to the pride of ownership and the care invested. While most homeowners don’t freshen their home’s exterior paint as often as they do their interior walls, it’s an important part of maintaining not only the curb appeal of your home, but the defense against weather and everyday wear.

For homeowners with paintable exterior surfaces, including vinyl or aluminum siding, wood siding, brick, stucco, and concrete, an annual inspection is a smart part of routine maintenance. Visible signs of wear such as cracking, peeling, bubbling, or fading often indicate that protective coatings are beginning to fail. A professional assessment can determine whether maintenance painting or a full refresh is needed and help identify the ideal timing for the project.
When properly prepared and applied, exterior paint typically performs well for five to seven years, but the frequency depends entirely on exposure and environmental conditions. Every home takes a beating from the elements, season after season. The most significant contributors are moisture from rain and humidity, along with prolonged exposure to the sun’s UV rays, both of which accelerate the breakdown of exterior paints and stains.
Other factors can worsen wear. Shade or heavy vegetation may block airflow and prevent surfaces from drying properly after rain, creating conditions that contribute to peeling or mildew. That’s why we recommend an annual exterior inspection. Look closely for early signs of peeling, cracking, blistering, or chalking, especially in areas exposed to direct sunlight or areas that remain damp for extended periods.
If you notice peeling or cracking in certain areas, it doesn’t necessarily mean a home’s entirety requires repainting. In many cases, maintenance painting can address targeted sections that need repair or refreshment. Staying proactive with carpentry repairs and touch-up painting saves homeowners time and money. Addressing minor deterioration early is far more manageable than allowing it to become a bigger problem.

For the Main Line area of Pennsylvania and much of the Northeast, the best time to paint the exterior of your house is from spring through fall — we like to say from St. Patrick’s Day to Thanksgiving, as long as the weather permits.
Temperature is the primary factor in determining when you should and shouldn’t paint the exterior of your home. During any temperature extremes — hot or cold — it’s best to avoid painting and wait for milder conditions. Ideally, exterior painting is done when daytime temperatures are consistently at least 50 degrees or higher. If you’re painting the exterior of your home yourself, pay attention to the “best use” specs provided by the paint supplier.
It’s too hot to paint exterior surfaces when the temperature is 100 degrees or higher. Heat extremes can be dangerous for any painter to endure for long periods of time. They can also lead to uneven application as paint tends to dry more quickly in high heat, creating overlap marks that can remain visible even after the job is complete.
Any temperature below 40 degrees is generally too cold for exterior painting. Cold weather can interfere with proper adhesion and curing. It also limits dexterity, making it more difficult to handle brushes, rollers, and tools with precision, increasing the risk of uneven coverage or application issues.
Some specialty paints are formulated for use in temperatures lower than 50 degrees, but even then, extended exposure to cold conditions creates challenges that must be carefully managed to ensure quality results.

Exterior painting is an investment in both protection and longevity. Proper surface preparation, carpentry repair, priming, and skilled application all determine how long a finish will last. Professional painters understand how environmental exposures affect paint performance. They also know when maintenance painting is sufficient and when a full repaint is the better long-term investment.
At John Neill Painting, we specialize in custom exterior painting for residences throughout the Main Line and surrounding Philadelphia area. Whether you are maintaining a historic home, updating your current home for a fresh new look, or preparing for a sale, we offer meticulous craftsmanship, durable finishes, and peace of mind throughout the entire painting process.
If you’re unsure whether it’s time to paint, we’re happy to provide a professional assessment and help you plan your next step with confidence — contact us today.
When was the last time you washed your walls? If the answer is never, you’re not alone. With so many surfaces in a home to keep clean, walls are easy to overlook. However, when preparing for a paint project, built-up dirt, oils, and residue can affect both the appearance and longevity of the final finish.
Whether your home’s walls naturally show signs of daily life or you’re ready to refresh a room with a new coat of paint, you might notice your walls need a bit of attention. In these situations, some light cleaning may be necessary. Professional painters typically handle any wall washing needed as part of the preparation process before any paint is applied. But if you’re taking on a project yourself, here are a few professional tips for safely washing painted walls without damaging the existing finish.

You’ve likely washed the exterior walls of your home more often than the interior. Outside, your home is exposed to dirt and stains caused by weather, animals, and other natural elements. This buildup typically spreads across entire surfaces rather than appearing in isolated spots, which is why exterior cleaning often requires broader, more efficient methods and heavier-duty tools. Interior walls, on the other hand, call for a gentler, more targeted approach. You aren’t washing entire walls, you’re spot treating or focusing on high-traffic areas. High-traffic areas are the places in your home where your family members, pets, or guests are most likely to make contact with walls — either by leaning on them, touching them, or brushing past them. These areas typically include mud rooms, kitchens, hallways, and stairways.
The key to cleaning painted walls without damaging the finish is to work gently and avoid cleaning products with harsh chemicals. While most interior paints are designed to be wipeable, we don’t recommend fully washing or scrubbing walls the way you would floors. Instead, focus only on areas that truly need attention and follow these tips:
In some cases where discoloration or dirt accumulation is caused by burning candles, fireplaces, or furnaces, spot cleaning may not be sufficient. In these instances, you may need to seal and repaint the affected area. If you’re working with a professional painter, they will determine the best approach for these particular areas.
Areas painted with semi-gloss or gloss finishes (usually doors and trim) can typically be cleaned using a mild detergent and water, following the process outlined above. Flat paints (most often used on walls), however, are the least washable. Because flat paints are more porous, they tend to absorb moisture and cleaning solutions rather than release dirt. For this reason, flat-finish walls should not be cleaned the same way as glossier surfaces. Light dusting with a dry cloth may help, but in many cases, repainting the affected area is the most effective solution for removing stains.
In high-traffic areas where walls are more likely to be touched or scuffed, durability matters just as much as appearance. Scuff-resistant paints like Benjamin Moore’s Scuff-X were originally developed for commercial environments but have become a popular option for residential spaces such as hallways, stairways, and mudrooms. Sherwin-Williams’ Scuff Tuff is another durable choice designed to withstand frequent contact while maintaining a clean, consistent finish.
For help choosing the best paint finish for your interior walls, check out our “Ultimate Guide to Paint Sheens.”

As we mentioned, walls aren’t often regularly washed, and that’s okay. In fact, we don’t recommend fully washing or scrubbing your walls, as it can compromise the paint finish and reduce its lifespan. Instead, focus on spot cleaning high-traffic areas or places where residue has built up over time. Whether you hire a professional or take on a project yourself, it’s important for these areas to be cleaned before painting so that dirt, oils, and buildup don’t interfere with proper paint adhesion.
Generally, no. It’s safer to use a mild soap or gentle detergent on painted surfaces. And always avoid spraying cleaning products directly onto painted walls, as this can damage the finish and leave visible cleaning marks.
Dawn dish soap is a good option to use as a mild soap for washing walls. Add a few drops to warm water and use a soft sponge or cloth to wipe the targeted area clean, moving in gentle, circular motions, and avoid soaking the wall.

Proper wall preparation may not be the most exciting part of painting, but it’s one of the most important. In some cases, that prep includes cleaning your walls before painting. But you don’t have to be the one to do it. For many professional painters, including John Neill Painting, it is all part of the comprehensive preparation done to ensure the most polished finish. We always take time to gently clean high-traffic areas to ensure a smoother application, better adhesion, and a longer-lasting result.
If you’re planning an interior painting project and want expert guidance, we’re here to help, from start to finish. Our painters are true artisans, trained in fine detail and surface preparation. Contact us today to schedule a consultation and make sure your next paint job starts with the right foundation.
As your home endures the wear and tear of every season, its exterior is constantly exposed to the elements. Rain, snow, wind, and fluctuating temperatures all take a toll over time, often in ways that aren’t immediately visible. Contaminants like dust, dirt, salt and pollution deposits build up over time. If left untreated, they can accelerate paint and surface deterioration.

Pressure cleaning, also referred to as pressure washing or power washing, is one of the most effective ways to restore and protect your home’s exterior. Most homeowners know painting is required to maintain the exterior of your home, but many overlook another key factor in extending both the durability and longevity of a sound exterior paint job. Whether you’re planning on selling your home, or just want to ensure it maintains its curb appeal, routine pressure washing plays an essential role in exterior maintenance.
Absolutely. As dirt, mold, mildew, and other environmental contaminants build up on the exterior of a home, pressure washing is an effective way to remove them and restore a clean surface. Regular pressure washing can not only help maintain the value of your home, but also add longevity to painted surfaces and woodwork.
Pressure washing a home once every two to three years is an excellent way to prevent exterior paint from wearing down and keep surfaces clean and protected. Homes in areas with heavy tree coverage, high humidity, or exposure to road salt may benefit from more frequent cleaning. Other areas around the outside of a home that benefit from pressure washing include decks, walkways, patios, and pool surrounds.

A homeowner can certainly do their own power washing if they have the proper equipment and understanding of how to approach the job properly. There are a few tips we like to provide for the DIY homeowner:
Most homeowners purchase pressure wash equipment that’s not suited for washing the entirety of an average home. Smaller power washing machines don’t typically offer the hose length or the pounds per square inch (PSI) needed to effectively clean large-square-footage surfaces. These DIY machines are nice to have around for smaller washing projects like patios, decks, fences, and other outside spaces but can rarely handle the full exterior of a home.
Caution must always be used when using any pressure washing equipment. Even the small power washing machines have sufficient power to do damage if not used correctly. Most damage caused by homeowners using power washers occurs when the wrong tip is used, which intensifies the water stream and reduces the safe distance between the nozzle and the surface being washed.
Always start further away from the surface and move closer as needed. And always use the color-coded tip that provides the most diffused water stream, changing the tip to a more concentrated stream only when needed. Never try to blast a stubborn stain from a surface by getting too close or by adding the most concentrated tip. This could result in surface damage, especially for soft materials.
Controlling where you direct the pressure washer is just as important as the pressure setting itself. Improper technique can force water into areas of your home that are not designed to withstand it, leading to moisture damage, mold growth, and costly repairs.
Never direct high-pressure water into soffits, vents, or exterior crevices, especially when standing on the ground and aiming upward. This vertical spray can drive water behind siding and into wall cavities in ways that natural rainfall never would.
Doors and windows also require special care. Never aim pressurized water directly at windows or doors from close range, as the force can compromise seals, damage frames, and allow water intrusion. These areas should only be gently rinsed from a safe distance using low pressure, just enough to remove surface dirt without forcing water past protective barriers.

The time it takes to power wash an exterior depends on structure size and condition, the horse power of the equipment, and the presence of any obstacles such as trees, shrubs, or gradients. An average-sized home in average condition can be washed by a professional in one day, excluding other exterior areas like walkways or decks. For DIY homeowners, the process can take longer, especially the first time, as it requires becoming familiar with the equipment and learning how to maneuver it effectively.
While DIY pressure washing may seem cost-effective upfront, the best results of power washing a house or building is best achieved by hiring a reputable power washing company. The cost of hiring a professional will depend on the size of the home, exterior material being washed (e.g. stone, stucco, brick, siding, etc.), and level of build up to be removed — with all things considered, it’s a considerably lower expense than the cost of repainting your home.
If your home has multiple stories, delicate exterior materials, visible mildew or algae growth, or areas that are difficult to access safely, hiring a professional is the best option. Professional pressure washing ensures surfaces are thoroughly cleaned without risking damage to siding, trim, windows, or surrounding landscaping, and prepares your home properly for future painting or maintenance.

Pressure washing is an important step in protecting your home from long-term damage caused by moisture, buildup, and environmental exposure. If your home is due for pressure washing, or if you’re preparing for exterior painting, John Neill Painting offers professional pressure cleaning as part of a comprehensive exterior maintenance approach, designed to preserve your home’s value, extend the life of painted surfaces, and identify potential issues before they become costly repairs.
Contact our team today to get a free home maintenance inspection or schedule exterior maintenance services to ensure your home is properly cleaned, protected, and ready for the seasons ahead.
Before a single drop of paint is added to a wall or ceiling, careful preparation is needed to ensure a flawless finish to any interior space. That includes the tedious but necessary stage of drywall repair. Drywall repairs can include anything from filling a nail hole to replacing full sheets of drywall. No matter the extent of the repair, the goal is always the same: to restore and create a smooth, paintable area that helps ensure a polished look.
Before starting your next interior drywall repair and painting project, here are several professional techniques that make the difference between a visible patch and a seamless result.

Professional drywall repair is methodical. Rather than rushing to cover damage with paint, experienced painters focus on understanding the type of imperfection, selecting the correct repair approach, and preparing the surface so the repair disappears once it’s painted and finished.
Drywall imperfections generally fall into two categories:
Identifying which type of repair is needed is critical, because each requires a different preparation technique for a smooth, lasting result.
When drywall damage is caused by an outside force pushing inward, such as a door handle or furniture, it’s commonly referred to as an “innie.” In these cases, the area’s drywall breaks and the pieces are pushed back into the wall cavity.
If the hole is large enough, broken pieces can sometimes be removed by hand. If access is limited and the pieces aren’t interfering with the repair, they can remain in place and be covered with setting-type patching compound, without affecting the integrity of the repair.
An innie is repaired by rebuilding the surface until it’s flush with the surrounding wall. For small repairs under two inches, a stiff setting-type compound or plaster is used to fill the void. The key is applying the material in thin layers, allowing each coat to dry fully before the next. This process, known as “floating,” gradually brings the repaired area level with the surrounding surface.
For larger areas of damage, the most durable solution is to cut out the damaged drywall and install a properly secured patch before finishing begins.
Protruding drywall damage — often called an “outie” — occurs when nails, screws, or fasteners pull material outward, leaving raised or jagged edges around the damaged area.
In these cases, the first step is to carefully cut away the protruding material by using a sharp utility knife or drywall tool. Once the surface is flattened, patching compound is applied in layers and sanded between applications. Achieving a seamless finish typically requires two or more coats of compound to fully level the area.
Feathering is one of the most important steps in professional or DIY drywall repair. It’s the technique that allows a patch to blend into the surrounding wall rather than stopping abruptly at the edge of the repair.
Feathering involves gradually thinning the patching compound outward from the center of the repair, extending beyond the damaged area and tapering the edges smoothly. This prevents visible ridges or hard lines and ensures light reflects evenly across the surface once it’s painted.
Once a wall has been patched, it’s absolutely necessary to cover them with primer before you continue with your wall color of choice. Painting directly over an unprimed drywall patch is one of the most common reasons repairs remain visible. Without primer, the paint can absorb unevenly into the patching compound, causing a visible difference in sheen known as “flashing.”
While modern high-quality paints are often labeled as self-priming, professionals still typically rely on dedicated primers when painting over bare drywall or patching compounds for the most reliable results.
The materials used in drywall repair matter just as much as the technique. While many quick-fix kits are marketed for convenience, professional drywall repair prioritizes durability and invisibility over speed. High-quality patching compounds, drywall, primers, and tools ensure repairs remain stable over time and blend seamlessly once painted.

Once you’ve completed your drywall repair and primed the necessary areas, you may wonder what type of paint to use when it’s time to cover your walls. There really isn’t one single “best” paint for drywall repair. What’s key is matching the existing finish and ensuring proper preparation.
Any paint finish, whether it’s flat, matte, satin, or gloss, can be used successfully as long as the repair is smooth and feathered correctly, the area is properly primed, and the finish coat is applied evenly.
Yes. Most professional painters handle drywall repair as part of the painting process. High-quality paintwork depends on the condition of the surface underneath. Even the best paint can’t completely hide dents, ridges, or poorly feathered patches. That’s why experienced painters address drywall imperfections before any finish paint is applied, to ensure walls look intentional, not freshly patched.
The cost of drywall repair and painting depends on several factors including:
Minor repairs may be addressed as part of a larger painting project, but extensive damage involving drywall replacement may require additional time and materials. A professional evaluation ensures the repair is done correctly and priced appropriately.

Drywall repair may seem simple, but achieving seamless results requires experience, patience, and the right materials. Hiring a professional is especially important when repairs are in highly visible areas, when gloss or satin finishes are being used, or when textures surfaces are involved. Professionals don’t just fix the damage, they ensure your walls and ceilings look as if the damage never existed.
At John Neill Painting, drywall repair and painting are handled with the same level of care and craftsmanship as our high-end residential painting projects. We focus on preparation, precision, and finish consistency so repairs disappear into the surrounding surface. No flashing, no visible patches, and no distractions.
Whether you’re addressing small imperfections or repairing larger areas before painting, our team delivers clean, professional results that restore the integrity and appearance of your home.
Check out our portfolio and contact us today to discuss your next drywall repair and painting project.

Successful interior design and painting is about more than following rules — it’s about understanding when to apply them and when to adapt them to your home’s architecture and lifestyle. Thoughtful preparation, high-quality materials, and meticulous execution all contribute to a refined result. Whether you’re tackling a single room or refreshing an entire home, borrowing strategies from the professionals will help you create a polished, cohesive, and visually stunning interior.
Interior design and painting relies on a balance of planning, restraint, and creativity. Experts consider architecture, light, proportion, and function before selecting colors, finishes, or décor. When these elements are layered intentionally, spaces feel cohesive, elevated, and designed rather than simply painted.
While creativity plays an important role, established interior design and painting principles are always important to consider for the best results. Design “rules” exist to create balance, harmony, and visual flow. Professionals know how to use these guidelines as tools, following them when structure is needed and bending them when a space calls for it. Understanding these rules helps ensure rooms feel intentional rather than overwhelming.
The 60/40 rule is a classic interior design guideline used to create balance in a room. It suggests that 60% of a space should feature a dominant color, while the remaining 40% is reserved for secondary or accent colors.
In interior design and painting, this often translates to wall color “filling” the majority of the space, with trim, furnishings, textiles, and accents providing contrast. When applied correctly, the 60/40 rule helps prevent finished spaces from feeling too busy or disjointed.

The 3-color rule is another widely used interior design principle that recommends using three main colors within a space:
Professional interior design and painting experts use restraint with accent colors and finishes and often rely on this rule to create harmony while still allowing for personality and visual interest. Sticking to three core colors helps keep rooms cohesive and intentional.

Rather than relying on a single neutral, professionals layer multiple tones within the same palette. Subtle shifts in warm whites, soft grays, or muted taupes add depth and richness while maintaining a calm, timeless aesthetic. This technique is frequently used in luxury interior design and painting projects.
Texture adds depth and dimension to any space. It can turn plain walls into eye-catching features. Professional painters apply subtle patterns and tactile finishes to soften lighting, highlight architectural details, and bring balance to a space. For a designer-level feel, try some of these interior design and painting techniques:
Color drenching: A bold, immersive approach where walls, trim, ceilings are painted in the same color for a dramatic, modern, and cohesive effect.
Color capping: This is a technique where the ceiling and sometimes a portion of the upper wall are painted in a contrasting or complementary color to create depth and emphasize ceiling height.
Coffered or tray ceilings: Similar to color capping, decorating your ceilings with contrasting colors, subtle metallics, or textured finishes draws the eye upward and can give your space a grand, custom-designed appearance.
Accent walls: If you have a fireplace, focal wall, or unique architectural element to highlight, this is a perfect technique to implement. Accent walls introduce a pop of color or texture that energizes the room without overwhelming it.
Wood paneling: Chair rails, wainscoting, and shiplap are all panel designs that can add architectural definition and dimension, and provide a luxurious finish with a traditional or modern flair.
Cabinet refinishing: This is a great technique for transforming a room without fully remodeling it. By resurfacing and applying a new stain or fresh coat of paint, you can brighten a room, modernize an outdated style, or bring dull surfaces back to life. Get our tips for refinishing cabinets here.

As you’re prepping, painting, and finishing, consider the quality of the materials and products you’re using. Premium paints, brushes, rollers, and primers don’t just make the job easier, they will drastically improve the final appearance. Higher-quality paints have richer pigmentation that can offer better coverage and smoother application, but they’re also more durable and washable, which is ideal for high-traffic areas like kitchens and hallways. By using top-tier materials, you can create your most luxurious and durable space.
There are several reasons why working with a licensed, accredited interior designer is often beneficial for both homeowners and contractors.
Designers bring a deep understanding of the full design process. Beyond selecting colors and finishes, they can foresee layout adjustments and how all the elements of a space will work together best. This holistic approach helps ensure the final result feels cohesive and intentional, rather than just pieced together.
Experienced designers also understand the sequencing and timing of work. They typically outline schedules and timelines for each contractor involved and often act as the project manager—coordinating trades, managing details, and keeping the project on track. This relieves homeowners from day-to-day decision-making and oversight, making the overall experience far more streamlined.
One consideration when hiring a design professional is the added cost. For some homeowners, that investment makes sense given the complexity of the project. For others, especially those working within a tighter budget or pursuing a simpler update, a designer may not be necessary.

In a broad sense, yes. Painting is a foundational element of interior design. While interior design focuses on the arrangement of furniture, lighting, and décor, paint color and finishes are often what visually tie a room together. Color should be chosen to complement architectural details, enhance natural light, and support the overall design vision.
For professional projects, interior design and painting are distinct skill sets, even though they work closely together. Interior designers define the vision, layout, and finish direction, while painters are responsible for providing the technical expertise and executing the vision with precision and care.
For homeowners who are not working with a designer, John Neill Painting offers color consultations and guidance on simple construction or finish decisions. In addition to painting, wallpapering, and specialty finishes, our carpentry professionals are there to support light renovations and surface alterations—helping homeowners keep projects efficient, cohesive, and well-executed without unnecessary complexity.

The cost to paint an interior space varies based on size, layout, ceiling height, wall condition, and finish level. Larger rooms, vaulted ceilings, detailed trim, or extensive surface preparation can increase the price. The best way to get an accurate price for your space is through a visual inspection. Every home and every room are unique and may require a different approach to reach the desired finished results.
For projects that involve historic elements, dramatic color changes, specialty finishes, or decorative details, additional time and expertise are required—and priced accordingly.
Interior design and painting are crafts meant to enhance the architectural features of your home, create an ideal atmosphere, and show off your style. With thoughtfulness, creativity, and great care, any room can be transformed into a space that feels refined. Managing projects yourself can be highly fulfilling. They can also be frustrating if you run into challenges along the way. Hiring the help of professionals can be the ideal option for some homeowners. When your project involves complex layouts, historic elements, or a carefully curated design vision, our biggest tip is to hire specialized and experienced professionals to ensure every detail is handled with precision.

At John Neill Painting, we regularly collaborate with interior designers, architects, and builders on high-end residential projects throughout the Main Line and Philadelphia. Designers trust us because we understand the importance of timelines, communication, and successful execution. We show up prepared, protect the schedule, and deliver finishes that support the design vision.
Whether you’re refreshing a single room or reimagining your entire home, our goal is simple: deliver exceptional craftsmanship, protect the design vision, and make the process easier for everyone involved.
Contact us today to schedule a consultation or start with an estimate request here.
When most homeowners think about paint, color gets all the attention. But sheen (the level of shine or gloss in a finish) is just as important. The right sheen can elevate your home’s architectural details, improve durability, hide imperfections, and even make your chosen colors look richer and more refined. The wrong sheen can highlight every flaw, look too glossy or too dull, and shorten the lifespan of your paint job. (more…)
A full kitchen remodel can be a major undertaking that is expensive, time-consuming, and disruptive to your daily routine. But what if you could achieve the same fresh, updated look without tearing everything out? That’s the beauty of refinishing. Refinishing cabinets can completely transform your kitchen’s appearance, restoring depth, color, and character while saving both time and money. (more…)

Your front door does more than just welcome guests. It defines your home’s character and gives a lasting first impression. But even the most beautifully finished doors can lose their luster over time. Sunlight, humidity, and seasonal temperature swings all take their toll, dulling the rich tones and sheen that once made your entryway stand out.
Refinishing is one of the simplest ways to bring that warmth and depth back to wooden doors. The key, however, is doing it right. Many homeowners start with the best intentions — a weekend project and a can of stain — only to discover how much precision the process really demands. Before you reach for the brush, it’s worth knowing what goes into a professional-grade finish and why craftsmanship makes all the difference between a quick refresh and a result that lasts for years.
Staining and refinishing is as much about preservation and protection as it is about color. A proper refinish requires attention to detail from start to finish and begins long before the first coat is applied.
The wood’s condition, how well it’s prepped, and even the weather on the day of application all influence how evenly the stain absorbs and how long it holds up. The right product choices and technique can mean the difference between a door that fades in a year and one that looks beautiful for a decade.
At John Neill Painting, our craftsmen take the time to evaluate every door before starting. We look at factors like wood species, sun exposure, and existing finish to determine the best restoration approach that typically falls into one of three tiers:
It’s this level of care and precision that ensures a rich, even finish that highlights the natural character of your home’s entry—not a temporary touch-up that fades by next season.
Need an expert opinion? Request an estimate. Our team will assess your door and recommend the best solution for lasting protection and beauty.

How much does it cost to refinish a front door?
The cost depends on the number of doors (one vs. two), their condition, the type of wood, and whether the old finish needs to be fully stripped. For most Main Line homes, the investment in professional refinishing can have a wide range that depends on each door’s unique qualities and the tiers above. That investment pays off in longevity, as a properly stained door can last years longer than a rushed or DIY application.
Can you stain over a stained door?
Sometimes. If the existing finish is compatible and still in good condition, it may just need a light sanding to prepare the surface. More often, though, the old finish has to be removed entirely to ensure the new stain bonds properly and doesn’t peel or blotch over time.
Do you have to sand a door before staining?
Yes. Light sanding is essential. It opens the wood grain and removes surface residue, allowing the stain to penetrate evenly and reveal the wood’s natural depth.
These details may seem small, but they’re exactly where craftsmanship matters most. One shortcut — skipping the sanding, choosing the wrong stain, or rushing drying times — can mean refinishing again in half the time.
When it comes to updating your front door, one of the biggest decisions is whether to paint or stain it. Both can transform your entryway, but they create very different looks and require different types of care.
Stain enhances the natural beauty of the wood grain, giving your door warmth and character. It’s ideal for solid wood doors and classic architecture where you want the craftsmanship to shine through. A properly stained door feels timeless and organic, with depth that paint can’t quite replicate. However, stain does require maintenance over time, especially on doors that face direct sunlight or heavy weather exposure.
Paint, on the other hand, provides a solid layer of protection and allows for nearly endless color possibilities. It can give a more modern or dramatic effect and may better suit doors made of engineered or composite materials. But while paint offers great coverage, it conceals the natural texture of the wood beneath. Touch-ups can be more noticeable if the surface chips or peels.
At John Neill Painting, we often help homeowners choose based on the home’s architecture, the door’s material, and its sun exposure. Some doors call for the elegance of stain, while others benefit from the durability of a painted finish. What matters most is that the process, from prep to product selection, is handled with care and precision to ensure a result that looks beautiful and lasts.
Once your door has been beautifully refinished, maintenance becomes the key to keeping it that way. A well-stained front door can last many years with the right care, but it isn’t a “set it and forget it” project — especially in a climate with four true seasons.
Regular cleaning is the simplest and most effective way to preserve your finish. Gently wipe away dirt, pollen, or residue with mild soap and water (no harsh chemicals or abrasive pads!). If your door faces direct sunlight or weather exposure, consider applying a clear protective topcoat every couple of years to maintain color depth and UV resistance.
We often hear the question, “Are stained front doors out of style?” Absolutely not. Natural wood tones are timeless. When cared for properly, they offer an understated elegance that complements both traditional and modern homes. A freshly stained wood door often becomes the standout feature of a home’s exterior.
For clients who want to keep their entry looking its best year after year, John Neill Painting offers routine maintenance and touch-up services. Whether your finish needs a light refresh or full reconditioning, our team knows exactly how to restore the depth and sheen that make a front door feel new again.

There’s no shortage of online tutorials promising an easy weekend DIY solution on the internet, but your front door deserves more than an experiment in trial and error. Professional refinishing not only enhances the door’s appearance but also protects it from weather, moisture, and time. On the surface it might look like a straightforward project, but achieving a smooth, even, and long-lasting finish takes more than just patience.
If your door’s finish is faded, peeling, or uneven, or if the wood itself has begun to crack or dry out, it’s worth bringing in a professional. Refinishing is as much an art as a science, and our craftsmen know how to balance both.
Take the question of spraying versus brushing, for instance. Each method has its place. Spraying delivers fast, consistent coverage, but brushing allows the stain to be worked directly into the grain for depth and durability. At John Neill Painting, our craftsmen combine techniques to create a finish that’s both beautiful and built to last — even under Pennsylvania’s unpredictable weather conditions.
Preparation is another area where professionals make a difference. Every step matters: stripping or sanding away old finishes, sealing edges and joints, priming where needed, and protecting hardware and glass. Skipping even one of these steps can lead to blotchy color, uneven sheen, or premature wear.
Our crews follow a process refined over five decades of experience. That means:
The result? A front door that doesn’t just look freshly refinished, it feels brand new.
When you partner with John Neill Painting, you’re getting more than a new coat of stain. You’re getting decades of experience, premium materials, and a team that treats your home like their own. From the first consultation to the final walkthrough, we take care of every detail so you don’t have to.
Your front door is the first thing you see when you return home and the first thing guests notice when they arrive. It should reflect the pride you take in your home — rich in color, smooth to the touch, and built to withstand the elements.
Refinishing your front door is an investment in both beauty and longevity. With the right care, it can remain the centerpiece of your home’s exterior for years to come.
If your door is ready for a refresh, trust the experts who have been delivering craftsmanship, care, and precision to Main Line homes for over 50 years.
Request an Estimate or call us at (610) 664-5555 today to restore your home’s first impression.
Want to make sure you’re keeping up with your exterior maintenance beyond just your front door?
Download our complimentary checklist.
info@johnneillpainting.com (610) 664-5555
231 Linwood Ave. Ardmore PA 19003
PA Contractor No. - PA014716
Licensed in PA, NJ & DE


Meticulous Preparation, Skilled Craftsmanship and a Commitment to Excellence
 |
We serve the following areas: Center City Philadelphia, Bala Cynwyd, Gladwyne, Narberth, Penn Valley, Merion, Wynnewood, Ardmore, Haverford, Bryn Mawr, Villanova, Wayne, Devon, Berwyn, Paoli, Malvern, Chester Springs, Newtown Square, West Chester, Blue Bell, Gwynedd, Jenkintown, Rydal, Meadowbrook, and Chestnut Hill.
© 2026 John Neill Painting & Decorating. All rights reserved. Privacy Policy.
